Configuring Proxmox VE 8 with an Open vSwitch LACP Bond and VLAN-aware Bridge for easy VLAN assignment
Do you want to be able to assign VLANs to Proxmox VMs and LXCs as if they were connected to a Switch with Access and Trunk Ports?
While adding VLAN-awareness to the default Linux bridge is already possible, utilizing Open vSwitch brings advantages, including features like VXLANs and RTSP.
In this Blog Post I will go over how to switch from the default configuration to Open vSwitch on your Proxmox Server. At the end, you will be able to assign any VLANs that are configured on your physical switch's trunk port connecting your proxmox node to Proxmox Functions and VMs on your node.
A future follow-up will discuss more complicated layouts as well as an introduction to the new SDN feature.
Requirements
You will need the following for this Guide:
- One or two Trunk Port(s) configured on a physical Switch or Router that are configured with all the VLANs you want available in Proxmox as tagged
- LACP configured on the physical Switch side if you have two ports available on your Proxmox Node
- Your Proxmox Server with at least one but ideally two physical interfaces that can be used for the new networking configuration
For this Guide, I am going to assume that you currently have network access to your PVE Node's Management Interface and we will make all necessary changes there before applying them and then, at the very end either re-configuring the Port(s) on your Switch to now act as a Trunk or plugging into (a) different, pre-configured Port(s).
Preparation
Firstly, turn off your VMs to avoid sending traffic to unwanted destinations while you shuffle things around.
Before starting on the network configuration, enter the Node's shell and make a Backup of your current configuration you can quickly roll back to in case something goes wrong:
cp /etc/network/interfaces /etc/network/interfaces.bak
While you're there, make sure you have the necessary packages installed:
apt install -y ifupdown2 openvswitch-switch
Then, navigate to your Node's Network settings, delete the currently configured virtual Interfaces and clear the configuration for all physical interfaces. Afterwards, it should look similar to this, but with a different amount and name of interfaces:

Make sure not to apply your changes until everything is configured, since you will loose the connection to your Proxmox Node until it is configured correctly and you have (re-)configured the Port(s) on your Switch to act as a trunk.
Configure the Open vSwitch Bridge
Firstly, we'll configure the Bridge that will act as a virtual Switch on our Proxmox Node.
Its configuration is essentially entirely transparent - what Ports are assigned to what VLAN or are part of the Switch gets configured automatically in the later steps.
Click on Create -> OVS Bridge in the top left of the networking section and set it up as follows, leaving most options empty unless you want a higher MTU (Jumbo Frames):
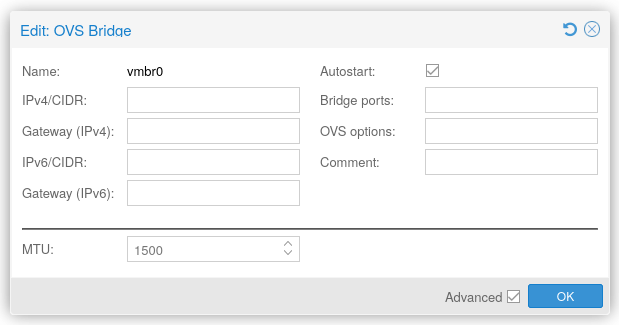
Click OK to confirm the creation.
Follow this and skip the LACP Section if you only have one physical Port on your Node
Instead of adding a Bond that will be added to the bridge, simply add your systemd interface name to the bridge configuration at this point. This should look similar to the following:
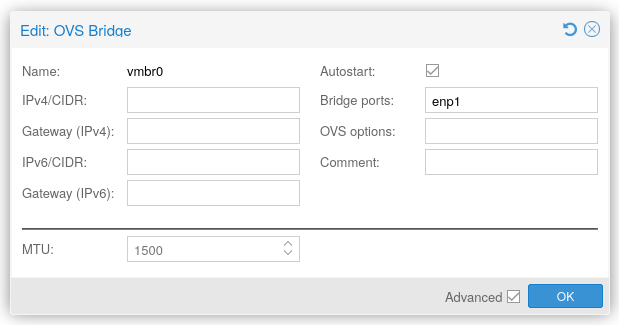
And of course don't forget to confirm with OK.
Configure the OVS LACP Bond (Trunk) to connect to your Switch
If there's more than two interfaces on your Proxmox Node and you need to figure out which ones are going to be used for your Bond, do so now. You can use the "ip" command to figure out which interfaces are plugged in. And note them down.
Then, click on Create -> OVS Bond in the top left and set it up as follows, setting the Mode to "LACP (balance-slb or -tcp)" and adding the interfaces you noted down in the "Slaves" Field, separated by a space:
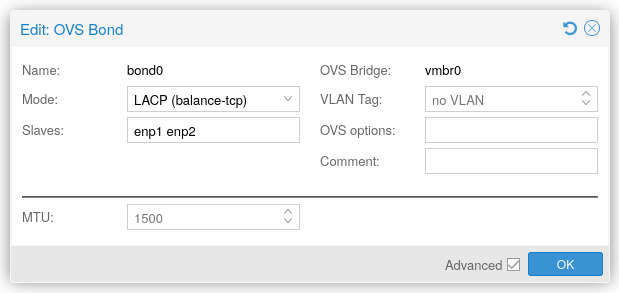
Please note that you need to configure at least two interfaces, otherwise this will fail.
Make sure you have the interface names correct and then click OK to confirm.
Configure the OVS IntPort for the Proxmox Host
This virtual Port will be assigned to the VLAN on which you want your Proxmox Host (this has no effect on the VMs) to communicate. So you'll want to configure a Static IP address you'll want to use for management.
Click on Create -> OVS IntPort in the top left of the networking section and configure it akin to as follows:
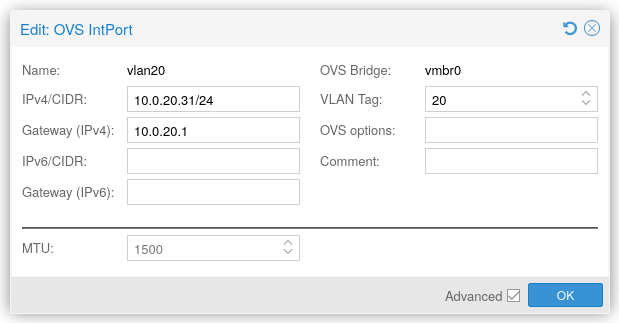
Of course make sure to replace the IP/CIDR, Gateway and VLAN Tag with what is applicable to your Network and Preferences. Then, click OK.
Switching over to the new Network Configuration
Now that we've configured an OVS Bridge, OVS Bond and OVS IntPort, your network section should look pretty similar to the following:

Take note of the fact that the IntPort and Bond have also automatically been added to the Bridge's configuration. If you were to set up these ports manually in the /etc/network/interfaces file, you would have to do that manually yourself. Adding the bridge to the IntPorts and Bonds configuration is not enough - those ports also need to be added to the Bridge's configuration.
Click "Apply Configuration" at the top.
Now, re-configure the port(s) on your switch or router as a trunk port or alternatively switch over to already configured port(s). You should be able to reconnect to the PVE Management Interface after the LACP Link has been established - this can take a minute on some old switches.
How to assign VLANs to VMs
Great! You've got a virtual Switch set up inside your Proxmox Node.
But what now?
Of course - time to assign your VMs to their VLANs!
This really is the beauty of this setup - all you have to do is go to your VM -> Hardware, edit the virtual NIC and change this field:
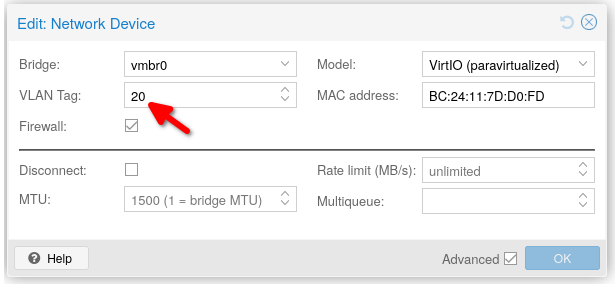
In the example above, the VM will behave as if plugged into a VLAN ID 20 Access Port with the PVID of 20.
Conversely, if the field was left empty, the VM would behave as if plugged into a Trunk Port, getting access to all VLANs and a PVID of 1.
Conclusion
Open vSwitch provides some exciting features - this guide just scratches the surface and is meant to get you started.
In future posts, I plan to delve more into the recently introduced Proxmox SDN features that really take advantage of some of the more advanced Open vSwitch functions.
Please consider subscribing for new post notifications if you liked this post and would like to be notified of future content!

Comments ()